Navigating a Remote HPC System
At the end of this class, you should be able to:
- Log onto a remote HPC system
- Explain the difference between the types of nodes
- Access information about HPC nodes
- Edit a remote text files on the cluster
How do we interact with a computer cluster?
When we interact with a computer (laptop, tablet, cellphone) we do so, as mentioned earlier, using the input devices (keyboard, touchpad, etc.) and we expect the result of this interaction to be a visual display of windows, output, buttons to push, icons, and widgets. This is known as a graphical user interface or GUI. The first thing we realize is that we cannot really work with a computer cluster in the same way that we work on our regular laptop. The reasons being that (i) the computer cluster may be located very far from our location (maybe even in a different timezone), and (ii) the computer cluster has no direct input devices attached and (typically) no GUI. For practical reasons, communication from the local device and the remote cluster will occur via the command-line interface or CLI. Here, commands are sent as plain text and if an output is returned, it will be printed as plain text as well. You have probably already seen a CLI (Linux or MacOS terminal windows), and probably already know how to open one on your local device. If not, don’t worry, here are some great resources to start with.
The following lecture will cover how to successfully open a CLI on the remote machine, and most importantly how to do so in a secure way so that other “listeners” on the same network will not be able to see the commands we are running nor the output we receive.
The Secure Shell or SSH Protocol

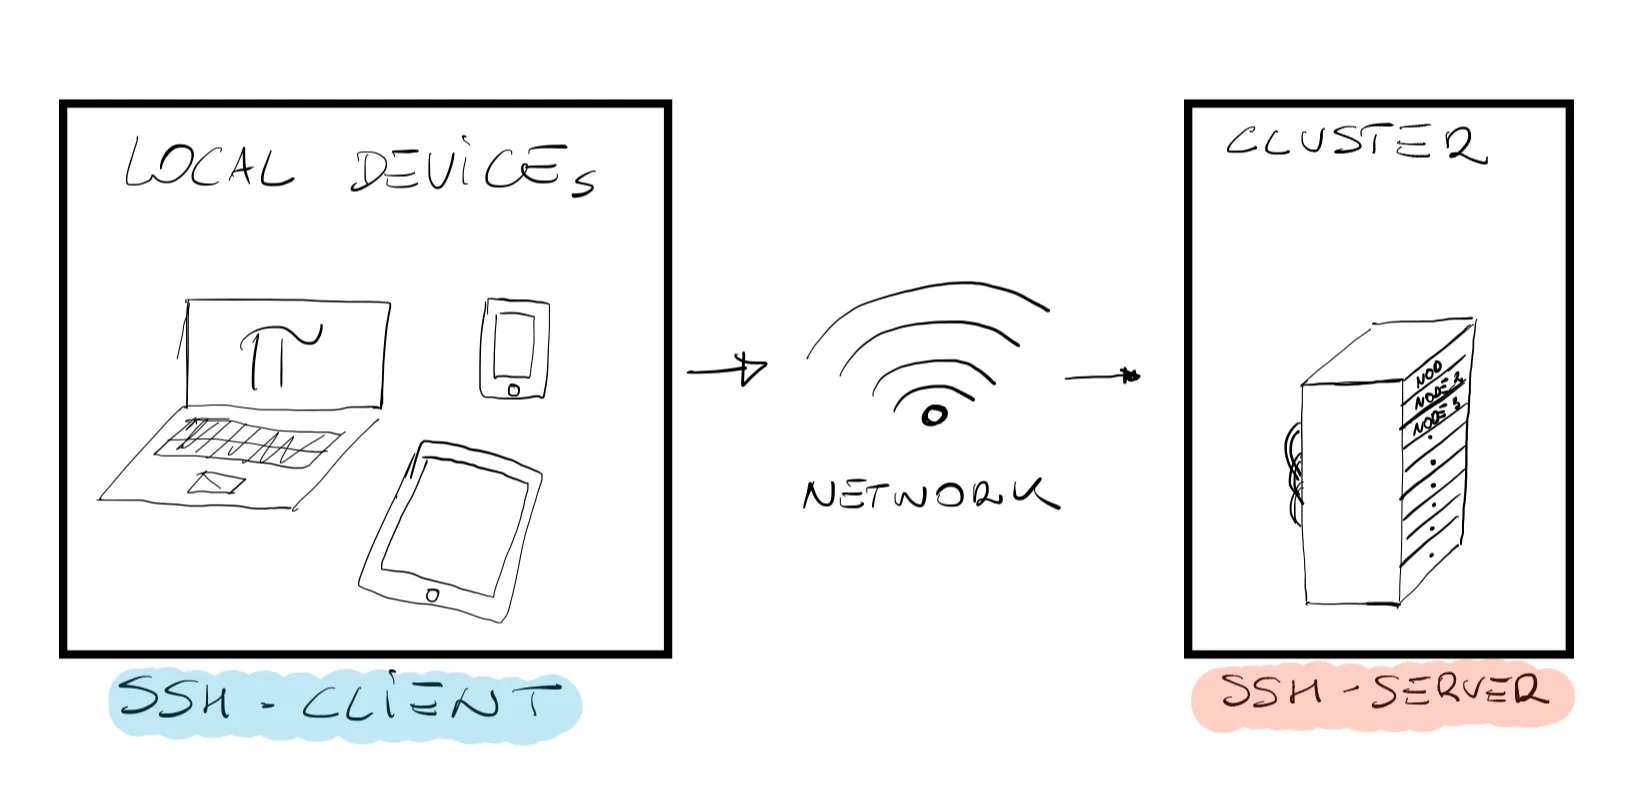
Common practice almost everywhere around the globe is to connect to a remote machine using the Secure Shell (SSH) protocol. An entire course could be developed on the SSH protocol, but for the sake of this short course think of it as a secure gateway on the remote machine. As shown in the above figure, SSH establishes an encrypted network connection between two machines, and the key being the word encrypted. Data transferred (sent or received) between the local machine (your laptop) and remote machine (the server) are “encrypted” so that a third party will not be able to read or modify your commands. Other users might still be able to see that data is being transferred, but they would not be able to read the content in the same way you will never be able to tell what is inside the Amazon boxes sitting outside your neighbour’s front door; you might guess, but you will never know for sure. The important thing to understand is that for SSH to work, it needs an SSH-client (installed on the local machine) and an SSH-server (installed and configured on the remote machine). SSH-clients are usually command-line tools that only require the address of the remote machine in order to establish a connection. If you are working on Linux or MacOS, an SSH-client is already installed (run the command which ssh on your terminal to verify), for Windows user we suggest to download the Git package (which comes with its own SSH-client) or MobaXterm.
To learn more about SSH click HERE.
Let us establish our first connection
If you have never used any of the Alliance systems, get started here: (optional)
This course is built to be used on the Digital Research Alliance clusters; the learning outcomes will be best met if the learner can access the system. This small addendum is to help the student get started on the Alliance systems:
- Apply for an account: All new accounts must be opened under an Academic Principal Investigator (faculty or adjunct faculty) who is registered with the Alliance.
- Get a sense of the training resources available
- Take a brief introduction to the ARC infrastructure at SciNet, Sharcnet or any of the other sites
Once you have completed these steps, you will have the tools needed to continue with this course.
We will carry out our example using one of the Digital Alliance clusters. If you are following this course and do not have access to the Alliance clusters, the process is very similar. As mentioned earlier, the only requirement by the SSH-client is the address of the remote machine. It will look something like username@hostname where:
username: your personal username (from the Digital Research Alliance of Canada).@: separates the local personal ID and the address of the remote machine.hostname: the actual address of the remote machine.
Go ahead, open a terminal window (or MobaXterm) and type (using your own username):
user@laptop:~$ ssh <username>@graham.computecanada.caUpon pressing enter, you will be asked to input your password. Caution: the character you will type after the password prompt will not be displayed on the terminal. Regular output will resume after pressing enter. If the password is correct you will notice that the terminal look changes as we are now connected to the remote machine and a welcome message (along with some instructions) might pop-up as shown below:
*********************************************************************
Welcome to The Digital Research Alliance of Canada/SHARCNET cluster Graham.
 Documentation: https://docs.alliancecan.ca/wiki/GrahamCurrent issues: https://status.alliancecan.ca/       Support: support@tech.alliancecan.ca
*********************************************************************
Graham has several types of GPUs, some of which are available with less wait: 320 p100 2/node, 12GB, original  70 v100 8/node, 16GB, newer, about 50% faster than P100 and with tensor cores 144 t4   4/node, 16GB, newer, about half a V100, for compute & AI except much slower FP64More details: https://docs.alliancecan.ca/wiki/Graham#GPUs_on_Graham
Along with the overall layout of the terminal window even the terminal prompt changed, and should now look something like:
[username@gra-login2 ~]$As you log into a remote machine you should be aware of the fact that your username is public. This makes the password you have chosen the weakest link in the security chain. If you want a more secure connection, you could generate an SSH key pair (your digital passport). A detailed process on how to set up an SSH key pair can be found here. Similarly, multifactor authentication is now mandatory on Alliance clusters.
Navigating the remote home
The first and most important question should be where have we actually logged into? Sometimes, when connecting to a remote machine, we have the misconception that we somehow turned on this giant computer and now we have access to ALL of it. However, the reality is much different. You can check the name of the host by typing:
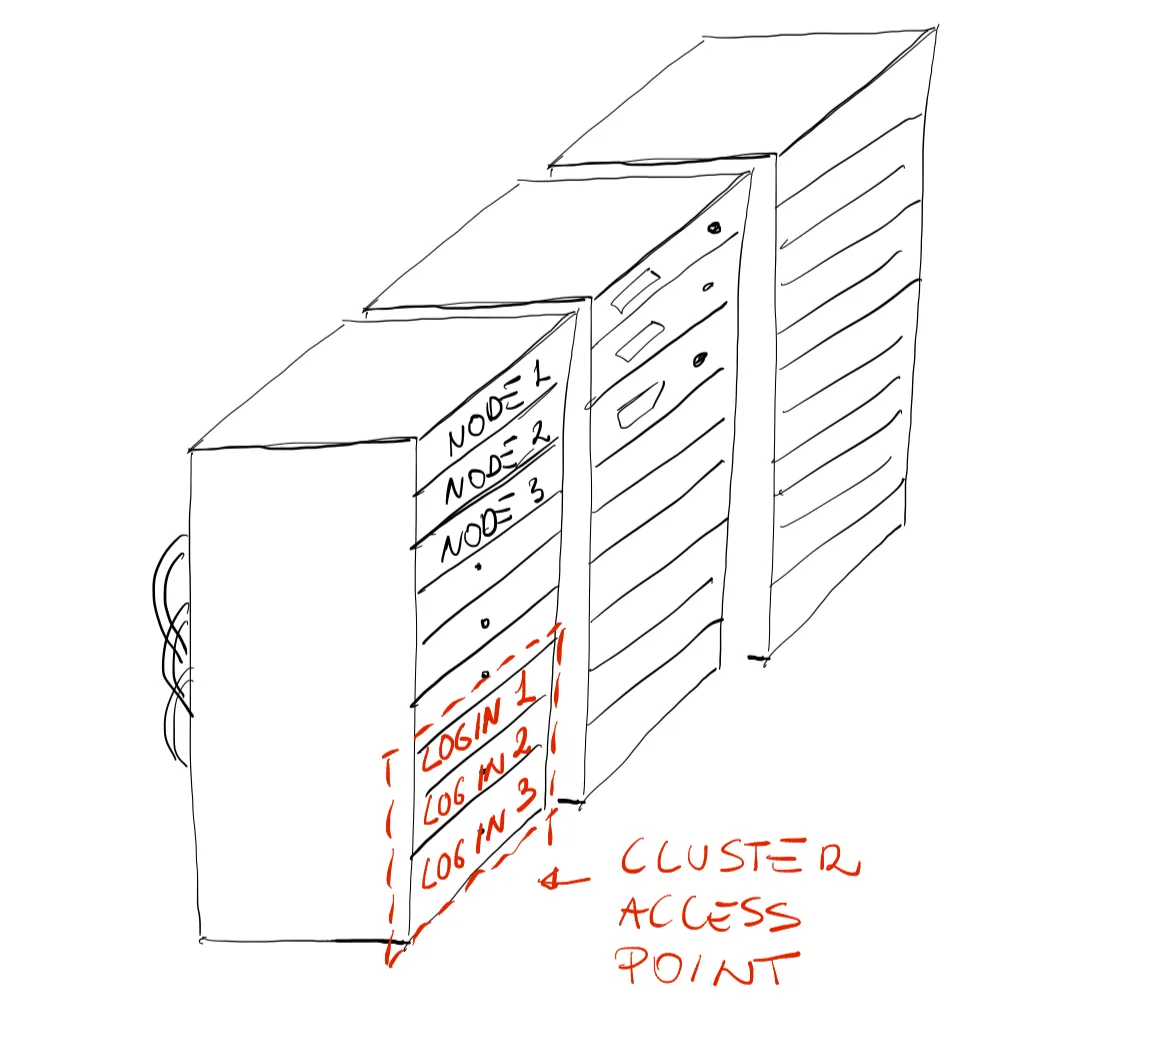
[username@gra-login2 ~]$ hostnamegra-login2Depending on the machine you have logged into, you will have a different hostname. Judging by the output above, we are definitely on the remote machine, however we logged into something known as a login node or head node. Large ARC systems will generally distinguish between login and compute nodes. As shown by the sketch below, login nodes serve as an access point to the cluster. The login node is well suited for uploading and downloading files, setting up software, and running quick tests. It should never be used to run any computations.

The reason login nodes should never be used to run heavy computations is that most likely, other users are logged into the same node. Type the command:
[username@gra-login2 ~]$ whoto discover who else is connected to that same node. You might be surprised to discover that (i) there might be quite a lot of people connected at the same time, and (ii) their usernames are public.
Before moving around, let us explore the login node. Type:
[username@gra-login2 ~]$ nproc --all32What this gives us is the number of CPUs in the current node. To have more information about the login node, you can type (on any linux-based machine):
[username@gra-login2 ~]$ lscpuThe output of this command will probably give you more information than you can digest, however, in light of the previous lecture, here are a few things to highlight from the displayed output:
Architecture: x86_64 CPU op-mode(s): 32-bit, 64-bit Thread(s) per core: 1 Model name: Intel(R) Xeon(R) CPU E5-2667 v4 @ 3.20GHz CPU MHz: 3200.000 L1d cache: 32K L1i cache: 32K L2 cache: 256K L3 cache: 25600KYou might have also noticed, in the previous commands, that the number after “graham” changed. That is because the login node is usually not only one, but rather a selection of nodes might be set aside by the system administrators to act as login nodes. In the Graham case we know that there are at least 3 login nodes. To check where we actually ARE we can run the command print working directory:
[username@gra-login2 ~]$ pwd/home/usernamehome is your remote personal directory on the remote system. You can pack this directory with whatever file/folders you want, just know that everything you save on the remote machine will STAY on the remote machine and after the login session is closed those files will not be accessible on your local laptop unless you manually downloaded them. The system administrator might also have populated your /home with useful directories and links. Run the following command to find out:
[username@gra-login2 ~]$ lsnearline projects scratchThe output might look a bit different based on the cluster you logged into. For some Alliance systems, /home contains links to other useful directories (nearline, scratch, and projects). It will be very clear in later sections the reasons behind these subdivisions.
As you might have guessed, since the purpose of the login node is as an access point to the cluster, there must be other nodes that are responsible for the computations. There are three main types of nodes that you will encounter on Alliance systems:
- Login nodes: your access point to the cluster.
- Compute nodes: the actual computer power of the cluster, the compute node purpose is to execute jobs.
- Visualization nodes: it might be necessary (sometimes) to start a remote graphical user interface to use software such as MATLAB or Paraview. The system administrators of many HPC systems usually set up a few nodes for a Virtual Network Computing (VNC). In very simple terms, VNC is a graphical desktop-sharing system that will give us all the benefits of having a GUI while still connected to the cluster.
The job scheduler

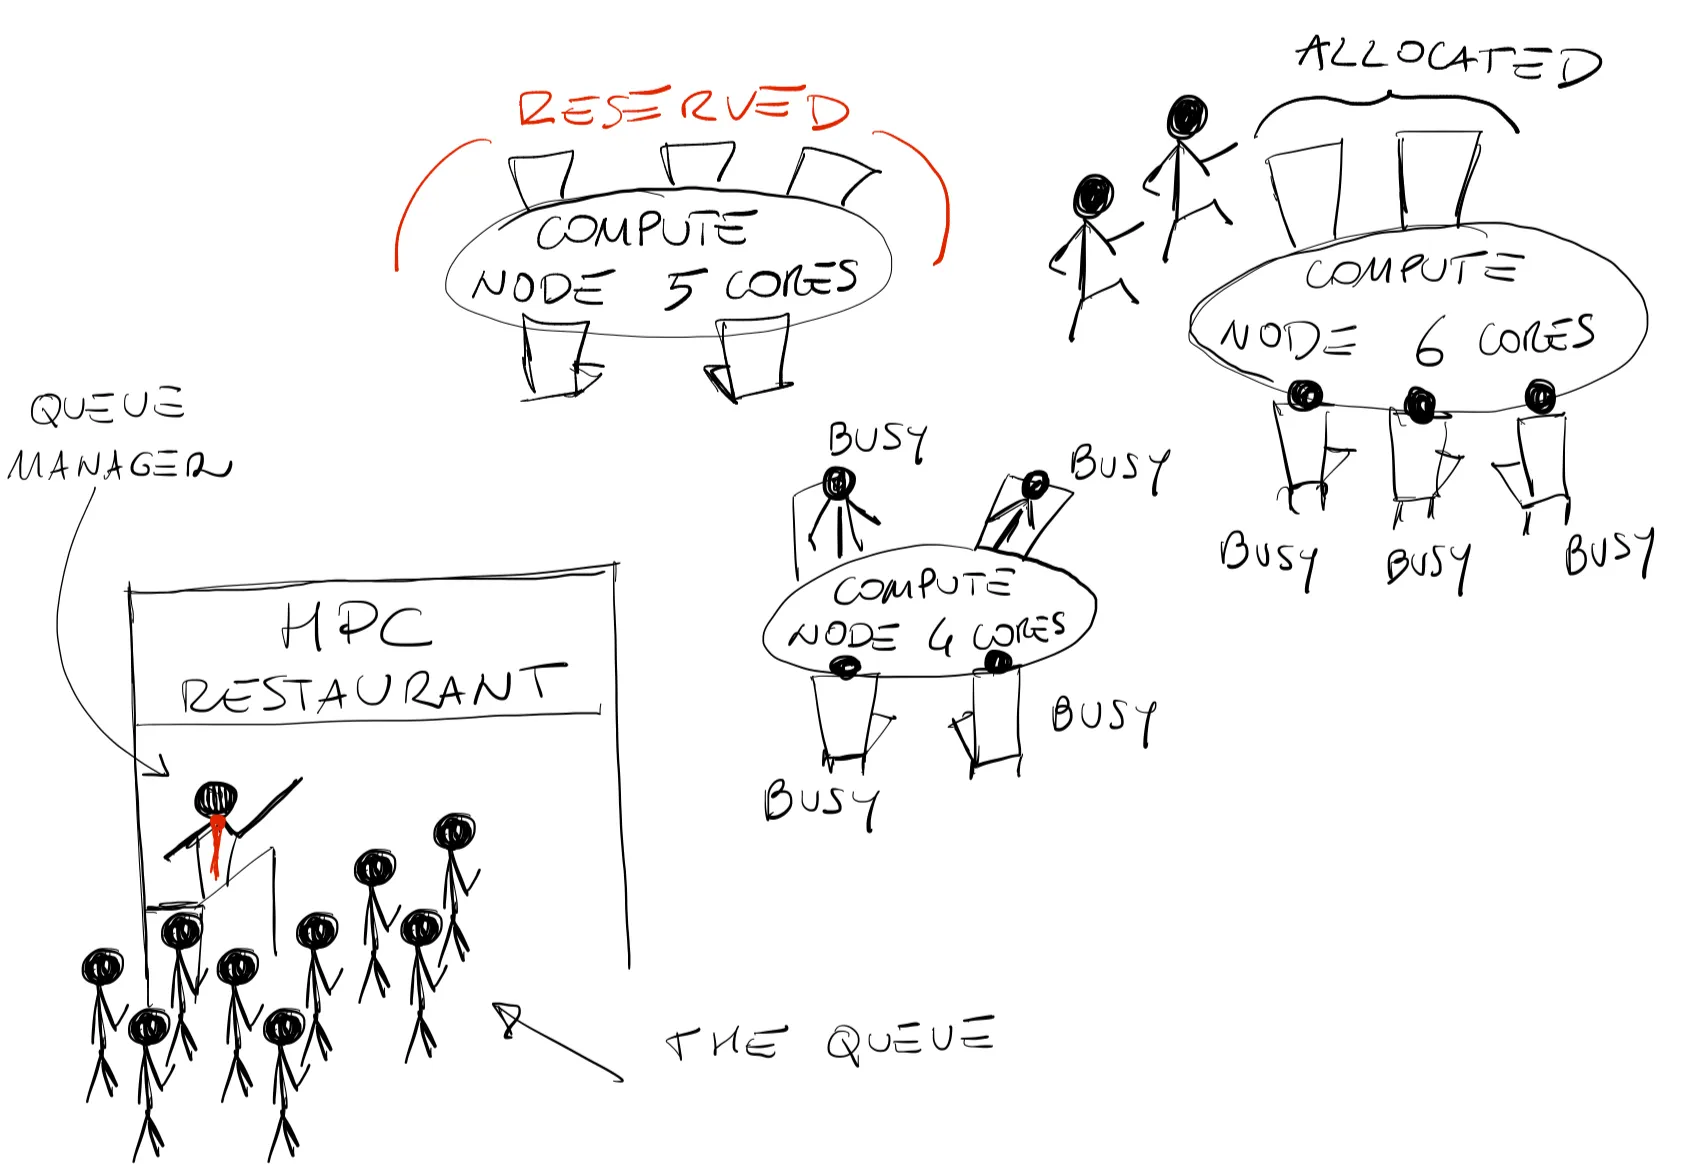
With many different processors available for computations, one might wonder who decides who does what on the cluster? There is a piece of software that is responsible for that known as the: the job scheduler. Every cluster has its own scheduler, but its purpose remains the same: to manage the computer cluster resources and allocate jobs submitted by users. In the very simple sketch above, we compare the job scheduler to a restaurant manager. A queue of people is waiting to enter the diner (jobs submitted by users), however they do not sit down immediately but rather pass through the restaurant manager who makes sure that every table’s capacity (compute node CPUs) is properly filled and everyone is served in a fair way. In most scenarios, the preferred way of using a computer cluster is to submit jobs (workload) to a scheduler system which governs access to compute nodes. The goal of the scheduler, and in general of a queue system, is to optimize and maximize the utilization of the cluster resources and, most importantly, to do so in a fair way to all users. Moreover, the scheduler will make our life much easier when we will need to run a lot of computations. Like many other clusters worldwide, the Alliance clusters use an open-source, fault-tolerant, highly-scalable cluster manager known as SLURM. SLURM (Simple Linux Utility for Resource Management) was developed primarily by Lawrence Livermore National Laboratory and as of 2021 it is the workload manager of about 60% of the TOP500 supercomputers. It is very much worth knowing how it works. As a workload manager, SLURM has three key functions:
- Allocating: allocating exclusive and/or non-exclusive access to resources (computer nodes) to users for some duration of time.
- Monitoring: providing a framework for starting, executing, and monitoring work (typically a parallel job) on a set of allocated nodes.
- Queue managing: arbitrating contention for resources by managing a queue of pending jobs. We will not go into too many details about the structure of SLURM (there are dedicated Compute Ontario courses about this) but here are a few things to remember: (i) SLURM consists of a deamon (slurmd) running on each of the compute nodes, and a central deamon (slurmctld) running on a management node, and (ii) information can be fetched using several user commands (salloc, scancel, squeue, sinfo, smap, srun, sbatch) a few of which will be explained in detail below.

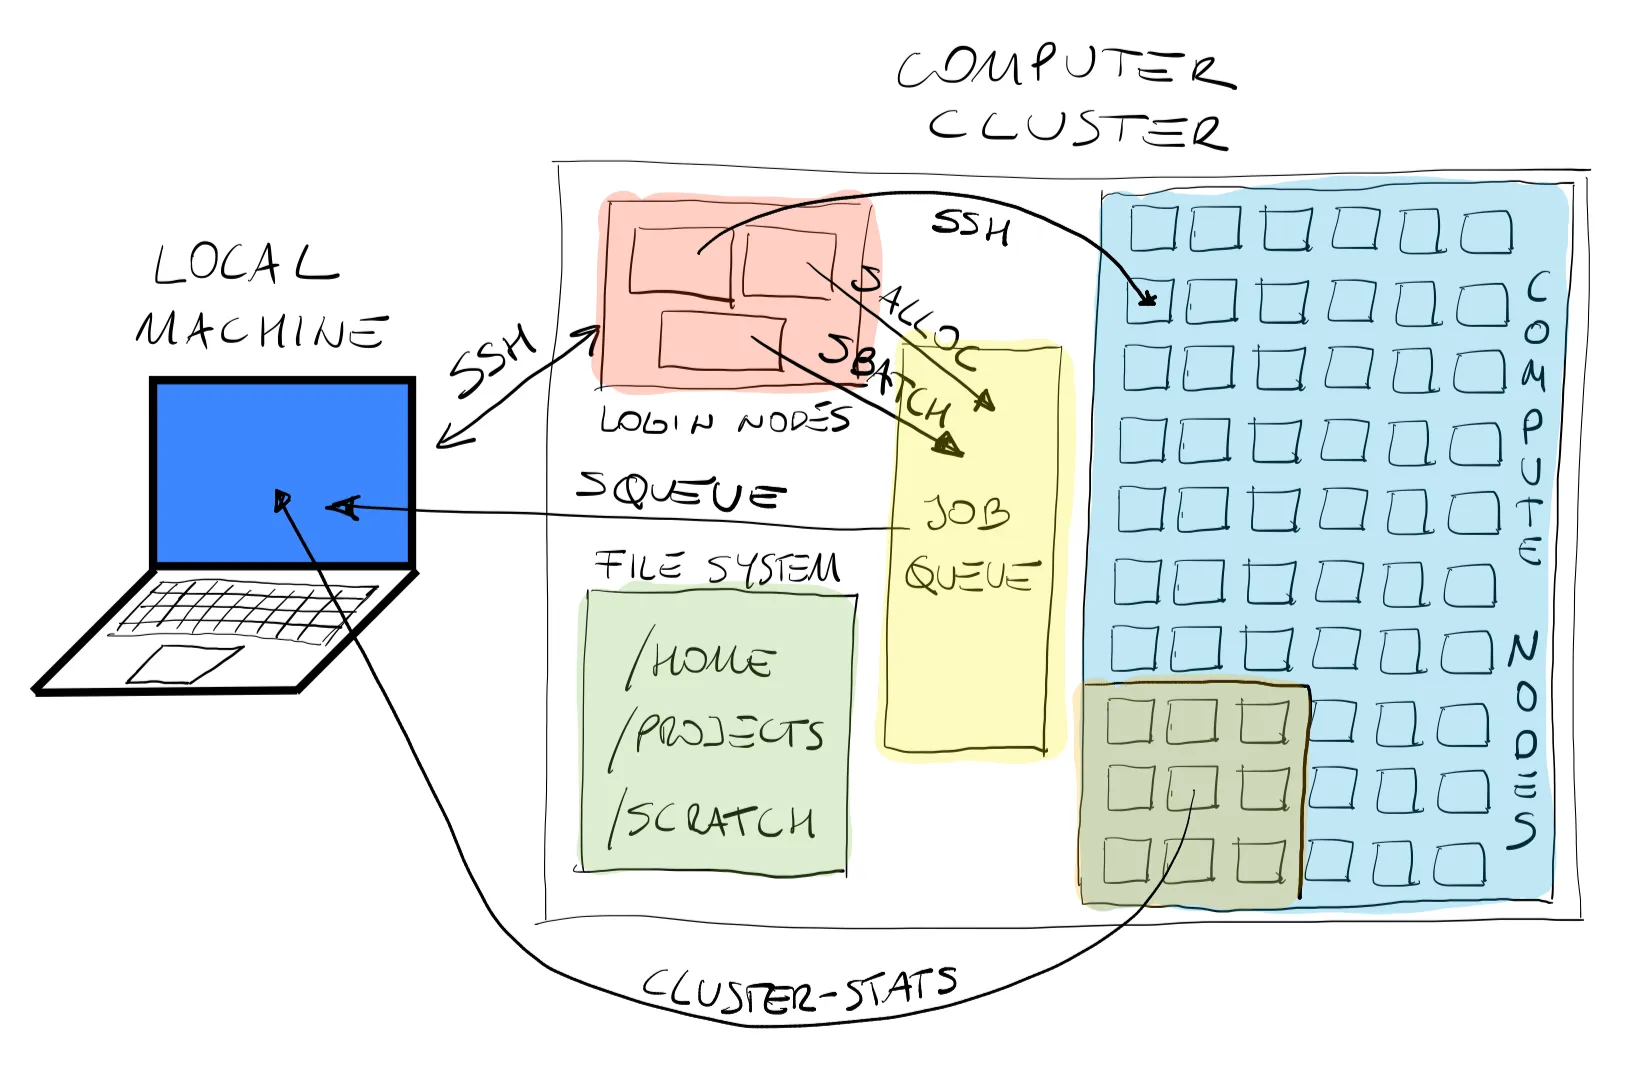
This figure shows the topology of the workflow in the computer cluster. As a user, we SSH from our local machine to the cluster, and as we have seen earlier we end up on a login node in our remote /home. From here we have several options: (i) we can submit our jobs to the queue, at what point the queue manager will take care of our now pending jobs, or (ii) we can SSH directly into a worker node to perform computations as an interactive node (also known as debugjob on some clusters). Once our simulations are running (or maybe still pending) we can fetch information from the queue manager to our local machine about the status of our jobs. Finally, when jobs are running, outputs are stored in the user’s selected directories. This brings us to the structure of storage and file management. Here are some important pieces of information you might want to remember:
/home: While your home directory may seem like the logical place to store all your files and do all your work, in general this isn’t the case; your home normally has a relatively small quota and doesn’t have especially good performance for writing and reading large amounts of data. The most logical use of your home directory is typically source code, small parameter files, and job submission scripts. We cannot not write to the/homedirectory from the compute nodes./project: The project space has a significantly larger quota. The data stored in the project space should be fairly static, that is to say the data is not likely to be modified. Otherwise, frequently changing data, including just moving and renaming directories, in project can become a heavy burden on the tape-based backup system./scratch: For intensive read/write operations on large files (> 100 MB per file), scratch is the best choice. The scratch storage should therefore be used for temporary files: checkpoint files, output from jobs and other data.
Important files must be copied off /scratch regularly since they are not backed up and older files are subject to purging!
What about text editing?
What you might have already noticed, now that we are remotely connected to the remote server, are a couple of problems:
- There is NO graphical interface (in most cases), and all you see is a terminal window.
- You will not be able to use your favourite text editor in graphic mode.
This raises the question: how do we edit files on the remote server? There are open-source, screen-based text editors that you can use to modify text files on the remote system. The following is a non exhaustive list of VERY COMMON screen-based text editors:
Here, we will focus on Vim. Vim (Vi iMproved) is an open-source, screen-based, very powerful, and extremely versatile text editor developed by Bram Moolenaar. First of all, type vim on your command line, and this is the output you should see:
~ VIM - Vi IMproved~~ version 8.2.360~ by Bram Moolenaar et al.~ Modified by Gentoo-8.2.0360~ Vim is open source and freely distributable~~ Help poor children in Uganda!~ type :help iccf<Enter> for information~~ type :q<Enter> to exit~ type :help<Enter> or <F1> for on-line help~ type :help version8<Enter> for version infoThe first thing you realize is that the vim welcome message pops up in the terminal itself. The welcome message also gives you a couple of VERY useful commands, such as, how to quit Vim, and how to get help.
Four Vim modes
The most important thing to understand is the mode VIM is working. There are 4 MAIN modes:
-
Normal: normal mode is the default start-up mode for Vim. This mode is read-only and you will be unable to edit the file. Very useful when consulting or studying a piece of code.
-
Insert: upon pressing
iyou will enter insert mode. In this mode you will be able to freely edit the file. Two very useful sub-commands are:awill turn on insert mode and move the cursor after the current character.owill turn on insert mode and move the cursor one line below. -
Visual: this mode allows you to visually highlight (select) text areas and perform operations (cut, copy, move) on them. Press
vto enter visual mode which will mark the beginning of the selection. You can use the arrow keys to highlight the desired text. -
Command line: this mode will allow you to perform operations such as: quit, save, replace, and search. Enter the command line mode by typing
:within normal mode.
If you do not know in which mode you are in, or if you want to go back to normal mode just press ESC. You will find that when you will be more used to using Vim, the ESC key will be one of the most used on your keyboard.
Five basic commands
Here are the 5 basic commands for using Vim as a beginner. However we strongly suggest a more in-depth analysis of the editor as you will probably gain in workflow efficiency:
-
Save command: suppose that you are now in insert mode (after typing
i,o,a, orINSin a full size keyboard) and say that you are happy and want to save the changes to your file, the command to save is:wandENTER. If you want to save and quit Vim, you would just type:wqand pressENTER. -
Undo command: suppose that you made some changes, but want to go back, NOT A PROBLEM: within a session Vim keeps track of your changes and you can go back by pressing
uuntil the oldest change. -
Navigation keys: Vim is designed to improve your productivity while writing codes. You don’t need to use arrow keys (usually placed on the far right of your keyboard) to navigate your code. Within normal mode you can move around using
h(left),j(down),k(up),l(right). Practice using these keys instead of the arrows and you will never regret it! -
Delete line command: you can delete an entire line by typing
ddwithin normal mode. This command will delete the line the cursor is sitting at. -
Search command: there are a few ways in which you can search in Vim. If you activated the line number, you can go directly to a specified line number # by typing
:#andENTER. You can also perform a word search by typing/followed by the word you are searching for. If you pressENTERVim will go to the word you searched that is below and closest to the cursor. At that point if you pressnrepeatedly Vim will jump to every location in the code where that word appears. When you reach the bottom of the code Vim will pop a message in the status bar “search hit BOTTOM, continuing at TOP” and will move to the top of the file. By default, search words are not highlighted and the search is case sensitive.
Click here
Right off the bat you might think Vim looks pretty boring, especially if compared with recent fancy text editors (e.g. Atom, VS code, etc.). By default there is no syntax highlighting, no programming language recognition, and no line number. So, how do you customize Vim’s look?. There is no dropdown settings menu where you can edit all the perks. Remember, Vim is meant to work without GUI.
At start-up vim automatically reads a config file called ~/.vimrc. This is the equivalent of your ~/.bashrc file for your terminal. If you just installed Vim or if you are a brand new user, chances are you do not have this file, so the first thing to do is to create the file at home: touch ~/.vimrc.
Inside this file you can now put all your precious settings to make Vim look very fancy! Here is a selection of settings which I believe will be useful for any Vim user:
set nocompatiblefiletype onfiletype indent onsyntax onset numberset cursorlineFrom top to bottom: nocompatible fixes compatibility problems between Vi and Vim, filetype on makes sure Vim recognizes the file by the extension and syntax, indent on follows indentation rules set by the given programming language, syntax on highlights keywords and functions based on the given programming language,** set number** puts the line number on the left side, and set cursorline underlines the location where the cursor is.
The status bar: a pretty awesome tool that will give you useful information on the file you are editing with Vim. The status bar is located at the bottom of the file and can give very useful information on the file we are editing. Here are the changes that must be included in the ~/.vimrc file to customize the status bar:
set statusline=set statusline+=\ %F\ %M\ %Y\ %Rset statusline+=%=set laststatus=2This is far beyond a complete course on Vim but just a quick showcase of useful commands that may spark your curiosity to use this wonderful tool. To learn more visit the Vim official page.
QUIZ
1.2.1 Once we connect to the remote cluster via SSH, we gain access to every single node of the supercomputer.
1.2.1 Solution
FALSE. We connect to the login (or head) nodes from which we can access the compute nodes upon request.
1.2.2 Say that I have to run a large-scale CFD simulation. Based on the simulation parameters and the size of the mesh the simulation will generate about 500 files each one 3GB in size. With the goal to store this data short-term, where would run the simulation and store the resulting data?
1.2.2 Solution
home: NO. This directory will not have enough quota to save all the resulting data./projects: NO. This directory is a group-directory meant for medium-to-long storage./scratch: YES. This is a good place to run your simulations and store temporary data, as it has about 20TB of storage capacity.
Having finished this class, you should now be able to answer the following questions:
- How do I connect to the remote machine?
- What is a login node? What is a compute node?
- What is the purpose of the job scheduler?
- How do I edit text files on the cluster?